Triumph Trophy SE Auxiliary Tank Installation
-
Triumph Trophy SE
Auxiliary Tank Installation
-
Prepare the bike for maintenance
-
Place the bike on the center stand.
-
Prepare for some fuel spillage.
-
Have some shop towels and/or oil dry material handy.
-
While it would be nice to have little to no gasoline in the main tank, this is not a requirement.
Later on you will be removing a fuel line. Even if the tank is pretty empty you will likely spill some fuel.
-
-
-
Disassemble Bike as follows:
-
Remove rider's seat
-
Remove pillion seat
-
Remove left pannier
-
Remove Left Side Fairing
-
Remove Left Side Panel below rider's seat
-
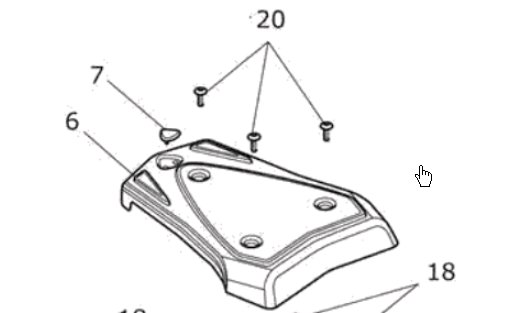
Remove Tail Rack Trim Panel
-
-
-
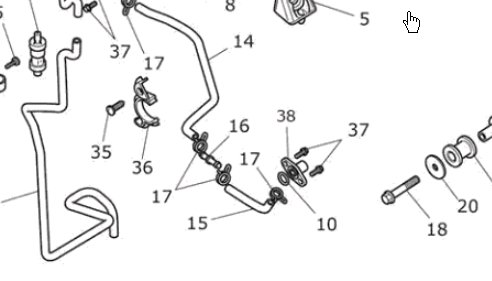
Install the Aux Fuel line at the tank end.
-
Prepare the aux fuel line.
-
Install the 5/16" T barb fitting on the hose on the center barb.
-
Install a hose clamp and tighten.
-
Do not cut this hose at this time.
-
Route the open end of the hose to a high point on the bike above the main fuel tank and fix it in place to prevent any fuel from running out.
Alternatively, you can temporarily place a plug in the end. (for example, a hose barb with QD attached, or some other type of hose plug).
-
-
Prepare the cross connect hose.
-
Locate gas tank cross connect hose.
This hose has a hose union connected with 2 hose clamps that connects the tank wings with the main tank.
-
-
Loosen the hose clamps but do not remove the hoses.
-
Here you have two choices.
Either pinch off the hoses with some clamps, or work very quickly to insert the T barb connector.
-
-
Remove the cross connect hose union.
-
Make sure the hose clamps are in place on the cross connect hose ends.
-
Install the T barb connector and tighten the hose clamps.
-
-
Install the Aux Fuel Line at the Aux end.
-
Route the Aux Fuel Line.
-
Run the hose to the rear of the bike along the frame panels.
Keep it as straight as possible.
Some zip ties will help hold it in place.
You will want the end of the hose finish up under the pillion seat area.
-
-
Trim the fuel line.
-
Place a hose clamp on the hose.
-
Affix the QD Plug fitting to this hose end and tighten the hose clamp.
-
-
Install the Aux Tank Mounting Brackets.
-
NOTE: While every attempt has been made to ensure a high degree of accuracy in hole alignment there are always some manufacturing tolerances, both from the motorcycle manufacturer and in our products. You might need to leave the mounting brackets a bit loose in order to get the tank mounting bolts installed. These can be tightened after the tank is installed.
-
Install Front Bracket
-
You will need to trim a bit of the side panel plastic to allow the mounting bracket to sit completely down.
You can use side cutters to take out the bulk of the material and then do final trimming with a utility knife.
-
Remove the forward mounting bolts from the tail rack/grab bar assembly
-
Place the front bracket over the holes and reinstall the original bolts.
-
-
Install Rear Bracket
-
Remove the rear mounting bolts from the tail rack/grab bar assembly
-
-
Place the rear bracket over the holes making sure the arrow points forward, and reinstall the original bolts.
-
-
-
Prepare the Auxiliary Tank for installation.
-
The plumbing items were not installed since there can be some variation in how you want the shut off valve positioned and how you want the outlet hose to be routed.
-
Use the included Oatey Great White pipe joint compound to make up all pipe joints.
We have included this at no charge because we have found it superior to Teflon tape. It provides a long lasting seal and lubricates the threads.
-
Determine how you want the shut off valve positioned.
Pay attention to the handle position in the open and close positions to make sure it doesn't hit anything. -
On the outlet side of the valve install a 5/16" hose barb. Tighten securely.
-
On the tank, install the 1/4" street elbow.
You will need to leave this just loose enough that you can make the final tightening adjustment AFTER the valve has been installed.
-
Install the valve
-
Install hose barbs on the quick disconnect plug and socket.
-
Determine the location of the quick disconnect fitting.
Normally, you will want the plug end installed on the hose connecting to the motorcycle main tank.
Trim the hose to length, place a hose clamp on the hose, install the QD plug, and tighten the hose clamp.
-
-
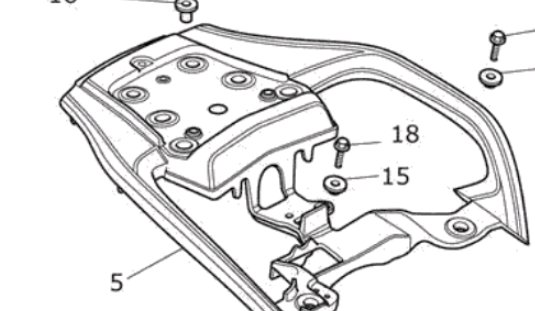
Mount the tank.
-
Note the position of the mounting holes and position the aux tank over the brackets in close proximity to these holes. The bracket fits very snuggly to the tank and you probably can't slide it around to make any major adjustments for hole alignment.
-
Visually ensure the holes are aligned and loosely install the M6 button head screws and M8 flat washer in each hole. Once all all 4 screws are installed you can tighten them.
-
Do not overtighten. The design of the mounting is such that these bolts provide attachment security due to shear forces (that is; the bolt would need to be cut to allow the tank to come loose). As such, they only need to be tight enough that they don't vibrate loose.
-
-
Final Fuel Line
-
Place a hose clamp on the hose and install it on the valve barb.
-
Route the hose from the valve towards the rear of the bike. There is clearance at the rear of the pillion seat for this hose to make a U-turn.
-
Trim the hose to length.
-
Place hose clamp on hose and then hose onto the QD socket barb.
-
Tighten hose clamp.
-
Join QD fittings.
-
-
Reassemble the bike.
-
Double check.
Make sure you have everything reinstalled properly and tightened down,
-
Go buy some gas!
-